Shader Material
Last class we looked at how to build and add meshes to a scene in three.js. Remember that a mesh is made up of a geometry and a material.
Just like in p5.js, three.js has many materials which have built-in shaders. We have been using MeshBasicMaterial, but there is also MeshNormalMaterial, MeshMatcapMaterial, MeshStandardMaterial, … each with its own parameters and requirements. We can change the material we use in our mesh to change its appearance.
We can also make our own material using our own custom shaders with a RawShaderMaterial. Much like in p5.js, this material takes two parameters, one for the vertex and the other for the fragment pass of the program.
Looking at the vertex shader, you will notice a few differences in the built-in variables compared to p5.js.
|
|
- The uniforms for the model and view matrices are not combined.
- The MVP (model view projection) matrices are named
modelMatrix,viewMatrix, andprojectionMatrix. - The position attribute is named
position. - The texture coordinate attribute is named
uv.
And that’s it! Otherwise, the shaders should look pretty familiar.
Textures
There are a few ways to load images, but the easiest is to use the TextureLoader. This ensures two things:
- That the image is loaded asynchronously, without freezing the app.
- That the texture object is ready to use even before the image is fully loaded.
Basically, no need for a preload() function or a progress callback. A single TextureLoader can be used to load many textures in the same app.
|
|
We can then pass the texture to the shader as a uniform, by adding it to a uniforms object when creating the material.
|
|
Because the shaders are nearly identical, we can bring in some of the concepts we learned for p5.js into our three.js sketches. Let’s bring in the noise functions and map them to the sphere using the texture coordinate attributes.
Blob O’clock
Let’s animate a blob like movement on our sphere using vertex displacement.
We can use the three.js Clock to get a running time value. We will pass this in as the uniform variable uTime. Because this value needs to change every frame, we will also update it in our tick() function.
Let’s move the noise functions to the vertex shaders, then calculate a position offset using the uv as input to the noise function.
|
|
This is starting to look interesting but there are a couple of problems that stand out:
- There is a seam in the sphere where the mesh is split and we can see inside of it.
- The noisy movement is two-dimensional, which you notice more if you increase the offset scale.
Mesh Normals
These two issues can be resolved by using a different attribute as input to the noise function.
- Noise requires continous input to give continuous output. The seam occurs because as we wrap around our sphere, we reach the end of our UVs values and jump from
1.0back to0.0. - The “2D” movement occurs because we are moving all our points in the same plane, even though they are spread across the surface of the sphere. We need a way to add a direction to the movement that corresponds to the vertex position on the sphere.
This is where using normals can come in handy. A normal is a 3D vector representing the direction a vertex is facing. It is perpendicular to the surface position of the vertex.
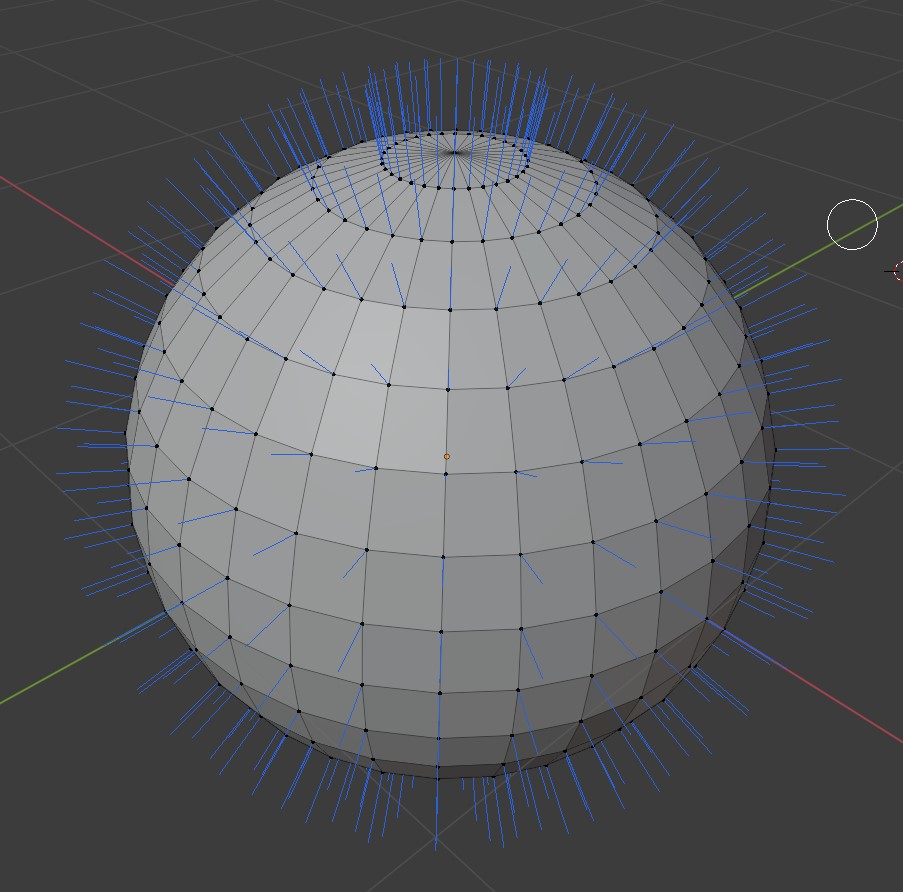
Normals are automatically added as vertex attributes when using built-in geometries in three.js. We can access them using the normal variable. Each vertex has a normal (along with a position and a uv).
A normal represents a direction, and this means by definition that it is a unit vector, i.e. that its length is 1.0. This is useful for many reasons but for our case, it means we can also use it as a color value. Any normal vector will have the values of its xyz components somewhere in the [-1, 1] range, so we just need to convert that to [0, 1] range to use as a color.
Like all other attributes, it is accessible in the vertex shader, and we can pass it to the fragment shader using a varying variable to color our sphere.
We can see that the normal value is a continuous gradient around the sphere. There are no hard cuts, so if we use this as input in our noise function, we should get a blob with no seams in it.
We will also multiply the noise displacement by our normal which will reorient the displacement so that it is aligned with the surface. This will resolve the 2D movement issue.
GUI
We can use the lil-gui package for drawing a GUI and adjusting parameters on the fly. It’s simple to add to a project and use, so let’s add it to our sketch to modify the noise and offset scales.
We first need to import the package at the top of the file:
|
|
Then we create a gui object. This is where we will add all the parameter sliders.
|
|
Finally, we add the parameters using the add() function. We can also set the range with min() and max(), the step with step(), and a custom name with name(). It’s all pretty self-explanatory; the only unintuitive command is in the add() function, where we need to pass the entire object hierarchy as an object until the last node (which is passed in as a string). For example, if we want to modify the value of sphereMat.uniforms.uNoiseScale.value, we would pass sphereMat.uniforms.uNoiseScale as the first parameter, and "value" as the second parameter.
|
|
Vertex Manipulation
Let’s combine everything we’ve learned to build a scene where our planet will travel in and out of a portal, and as it gets near the center it will get gradually more warped.
We will create a mesh using a TorusGeometry and add it to our group. We will use a MeshNormalMaterial on the torus, and will not need a custom shader for it. This material essentially does what we did when we converted our normal to a color earlier on this page.
We will also move our planet back and forth using a sin wave. We will do this in the tick() function so that the position is updated every frame.
We know the ring is at the origin (0, 0, 0) so we can assume the planet goes through the ring when its position is near (0, 0, 0). We will update the vertex shader to calculate an offset amount for each vertex based on how far it is from the origin.
- We will use the GLSL
distance()function to get this distance from the origin. - We will write our own version of the p5.js
map()in GLSL to remap this distance to a value in the range[0.0, uOffsetScale]. - We can clamp the mapped value to the range using the GLSL
clamp()function to make sure we don’t go out of bounds.
World Position
The “blobbiness” of the planet does not seem to be changing. Let’s debug the value of the offset scale to figure out if it behaving as expected. We can’t print the value to the console, or step through our code, so we will need another way to preview our value.
Let’s pass the calculated offset scale as a varying variable to the fragment shader and use it to color our sphere. It should be black when it is at the origin and gradually get lighter as it moves away from it. We will remap the value before saving it to make sure it stays in the range [0.0, 1.0].
The color remains black throughout the entire cycle, so something is wrong…
The issue is that we are calculating the offset using the “local” model position. We are looking at the vertex position on the surface of the sphere and not taking the sin wave movement into consideration.
In order to get the correct position value, we need to use the “global” (aka world) space position. We can get this by multiplying the model position by the model matrix. Once we have this position, we can use that to calculate the distance from the origin.
Note that since we have already calculated our world position, we can use it directly instead of modelMatrix * modelPos in our gl_Position calculation.
We now see the color changing as expected! Now that our code is working, we can go back to using the texture as our sphere color.
Since we already have our offset scale value available in the fragment shader, we can use it to affect the color as well. Let’s pass in the normal value as a new varying variable, and mix the color between the texture and the normal based on this offset scale.
Exercise
Build an animation of a ball bouncing on a paddle.
- The ball movement should be done in the vertex shader, not in the
tick()function. - Make sure the ball always stays on top of the paddle.
- Add some squash and stretch to be extra fancy.